Show Images Directly on Terminal: img2sh
Img2sh
Hello there,
In this post, I want to tell a brief story of how I have created a tool named img2sh. It is also my first python package which is published over PyPI. In this very post, I will try to answer questions like: How is it developed? What are the challenges? How should a package created and deployed over PyPI? Let’s continue!
Img2sh is a tool to show images directly on the terminal. For colored images, 256 xterm color support is required. This script basically resizes the image with anti-aliasing and quantized its colors to xterm color pallette. Github repository of the project can be reached from here
Demo
Testing the package is super easy. Install using pip and run.
pip install img2sh --user
img2sh demo.jpeg
Result:

Interactive mode
img2sh demo.jpeg -w 80 -i

q: quit z: zoom+ x: zoom- c: reset
arrow keys for navigation
cmd: q
For detailed usage arguments:
$ python img2sh/cli.py --help

usage: cli.py [-h] [-w WIDTH] [-i] Image

Show images directly on terminal.

positional arguments:
  Image                 the directory of the image which will be opened

optional arguments:
  -h, --help            show this help message and exit
  -w WIDTH, --width WIDTH
                        image width on the terminal
  -i, --interactive     open image in interactive mode
Story
As it can be understood from its name, img2sh is a python app to show images directly in the terminal. I think it could be helpful when connected over ssh to a server with no desktop environment. The images can be examined quickly on the terminal screen. While the tool was developed, the followings are the challenges I have encountered.
Images
In the digital world, images are made of pixels. Pixel is the smallest part of the image which can contain only one color. Color changes with the pixel intensity values. To keep it simple, I added a grayscale image to illustrate the pixel concept. It is a quite low resolution, grayscale image. Pixel values are shown in the following image. Pixel intensity values are changing with how far the pixel value close to black or white.
![]()
Colored images basically work with the same concept. The difference is colored images are usually indicated with 3 different pixel values which are red, blue and green. By this method, the proportion of these color intensity is changed to show different colors on screen.
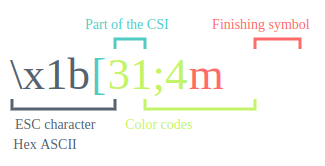
Colors in terminal
How the coloring mechanism works in the terminal should be figured out to implement this app. I understood clearly how colors are handling in an image using the following link. After that, I have found colored python module which provides support for colored terminal output from python apps. I implement the colors using this library.
http://jafrog.com/2013/11/23/colors-in-terminal.html
Parsing command-line arguments
How should the command line arguments be parsed? Actually it is quite easy with python. Let’s examine the next code block:
import argparse

parser = argparse.ArgumentParser(
    description='Show images directly on terminal.')
parser.add_argument("Image", help="the directory of the image which will be opened")
parser.add_argument(
    "-w", "--width",
    help="image width on the terminal",
    type=int
)
parser.add_argument(
    "-i", "--interactive",
    default=False, action='store_true',
    help="open image in interactive mode",
)

args = parser.parse_args()
After the initialization, arguments can be used with commands like args.width. The arguments can be configured as mandatory or optional and the type of argument also be specified. This package is a pretty useful and standard package that is widely used most of the python projects.
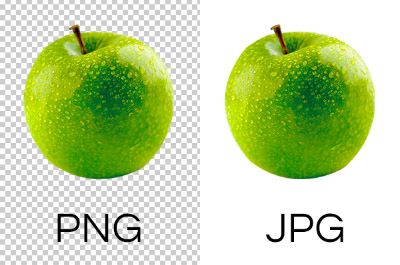
Image formats
For further improvement in the project, it should be solved how different image formats can handle. Fortunately, Pillow package can handle various kinds of image formats such as jpeg, png, tiff. This packet can provide pixel values for different image types using the same get_pixel method interface. However, the problem is the dimension of the color values are representing. At standard jpeg a pixel value is represented with 24 bits which are 3 bytes. Each byte value represents a different color channels Red, Blue, and Green. Png differs from the alpha channel. At PNG images, colors are created with 4 bytes. Red, Blue, Green, and Alpha. Alpha is the transparency channel of the image. So the dimension of the pixel is different. But this problem is easily solved in findNearestColor function. In these functions, the dimension of the pixel is handled.
Setup.py
In this section, I will try to answer the question that how to create a setup.py file which supports also entry point and can be executed without python shell. Setup.py file is used to define the python package metadata and its installation instructions.
from setuptools import setup, find_packages

with open('requirements.txt') as f:
    requirements = f.read().splitlines()

setup(
    name='img2sh',
    version=__import__('img2sh').__version__,
    install_requires=requirements,
    description=(
        'Show images directly on terminal using Xterm colors.'
    ),
    long_description=open('README.md').read(),
    long_description_content_type='text/markdown',
    author="Mehmet Ozan Unal",
    author_email='[email protected]',
    maintainer="Mehmet Ozan Unal",
    maintainer_email='[email protected]',
    license="MIT",
    packages=find_packages(),
    platforms=["all"],
    url='https://github.com/mozanunal/img2sh',
    classifiers=[
        'Development Status :: 4 - Beta',
        'Operating System :: OS Independent',
        'Intended Audience :: Developers',
        'License :: OSI Approved :: BSD License',
        'Programming Language :: Python',
        'Programming Language :: Python :: Implementation',
        'Programming Language :: Python :: 2',
        'Programming Language :: Python :: 2.7',
        'Programming Language :: Python :: 3',
        'Programming Language :: Python :: 3.4',
        'Programming Language :: Python :: 3.5',
        'Programming Language :: Python :: 3.6',
        'Programming Language :: Python :: 3.7',
        'Topic :: Software Development :: Libraries'
    ],
    entry_points={
        'console_scripts': ['img2sh=img2sh.cli:main'],
    },
)
The entry points of the module can be specified with specifying entry_points property of the object. It is defined as console script and first, the name of the executable should be written. It should be mapped to the executable python function. In my case, it is img2sh:cli:main.
There are useful tricks in the code block also. For example, you do not have to write a whole long description of this file. It can be read from different files like README.md. It is the same for your requirements. It still can be read from requirements.txt but with one condition. These files should be specified in the MANIFEST.in file.
MANIFEST.in
include README.md
include requirements.txt
include LICENCE
The following link great resource to create a setup.py file. I learned from here. You should check it out. https://python-packaging.readthedocs.io/en/latest/everything.html
Uploading python package
As you may already know, python packages are usually distributed using PyPI servers. When we use the pip package manager in default, packages are downloaded from this server. In this project, I want that my package can be installed over PyPI. So I created a PyPI account and upload my package there.
to Uploading the PyPI package actually quite simple. The following commands are required to create a package from a module and to upload it to PyPI servers.
python setup.py sdist bdist_wheel
twine upload --repository-url https://upload.pypi.org/legacy/ dist/*
Optimizing performance
How can be the performance of the tool optimized? In the first prototype, the code is written with simple logic. This causes too much processing time because of the for loops inside it. The following code part is written to find the nearest color inside a palette. The function loops in pallette and tries to find the smallest distance. In version 2, I implement it using numpy package. The operation executes in vectorial form and its execution time decreased exponentially. v1
def findNearestColor(color, pallette):
    distances = []
    if len(color) == 3:
        (colorr, colorg, colorb) = color
    elif len(color) == 4:
        (colorr, colorg, colorb, alpha) = color
        if alpha == 0:
            return None  # pallette.index((255,255,255))
    for c in pallette:
        (cr, cg, cb) = c
        distances.append(
            (colorr-cr)**2 +
            (colorg-cg)**2 +
            (colorb-cb)**2
        )
    return distances.index(min(distances))
v2
def findNearestColor(color, pallette):
    distances = []
    if len(color) == 3:
        (colorr, colorg, colorb) = color
    elif len(color) == 4:
        (colorr, colorg, colorb, alpha) = color
        if alpha == 0:
            return None  # pallette.index((255,255,255))
    c = (colorr, colorg, colorb)
    diff = pallette - c
    diffSum = np.sum( np.square(diff), axis=1)
    return np.argmin(diffSum)
# for v1
real 0m2,618s
user 0m2,519s
sys 0m0,080s

# for v2
real 0m1,690s
user 0m1,892s
sys 0m0,417s
Thank you for your interest. See you later…
Acknowledges
This package is developed using: